Arduino Board's basics
Arduino is an open-source electronics platform based on easy-to-use hardware and software. It is very cheap and useful but a little hard to understand but if you understand it properly then it is very easy.

This is an original Arduino Board
Basics:

The pins you are watching beside which some numbers are written are called Digital Pins, GND is called ground as it always provides negative current, numbers having wave sign beside them are called PWM pins [Pulse Width Modulation] because these pins work as digital pins as well as analog pins.
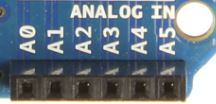
These are Analog Pins They take inputs in the form of Analog signals, and return values between 0 and 1023.

This is the memory of Arduino Board, any program you transfer into arduino board will be saved in its memory and if you want to save a new program then you have to do nothing to delete previous program it will be automatically removed when you will save new program.

This is the part through which you can send program into arduino board by connecting a data cable.

This is the reset button which is used to reset a program while it is being running.

This part is used to connect battery to the board so that we can provide it power. Battery is connected through a battery connector not the normal one it is a little different.

This is a Breadboard, you can give connections on it for many kinds of programs. As you can see at the sides where symbol of positive and negative are made, and after them there are holes, in those holes you can give connections but horizontally at both the side. and the points where alphabets are written in those holes you can give connections vertically if you see the board like it is shown in the picture. And the line between the alphabets of the two sides is the partition line because current does not flow through it.
There are 3 types of Jumper Wires:

These are jumper wires [Male to Male], these are used to give connections.

These are the jumper wires [Female to Female].

For now its over but in my next post you will get to know more about it


0 Comments:
Post a Comment